Print Tools
Print Quality Reference Guide
A printable reference for DPI standards, paper weights, bleed defaults, and common pitfalls.
Last updated:
What this tool does
A consolidated cheatsheet for anyone preparing files for print. Includes the standard DPI bands and what they are for, paper weight (gsm) ranges with typical uses, default bleed values for common print products, and a short list of mistakes that ruin runs. View it on the page or download the same reference as a PDF.
Free downloads
Ready-made Print Preparation Cheatsheet printables — free PDF downloads
No setup needed — download these print-ready print preparation cheatsheets as free PDFs. Each one was made with the generator above, so you can recreate or fully customize any of them.
Print Preparation Cheatsheet
Print-ready print preparation cheatsheet as a free PDF — made with the generator above so you can tweak and reprint.
↓ Download PDF
Reference
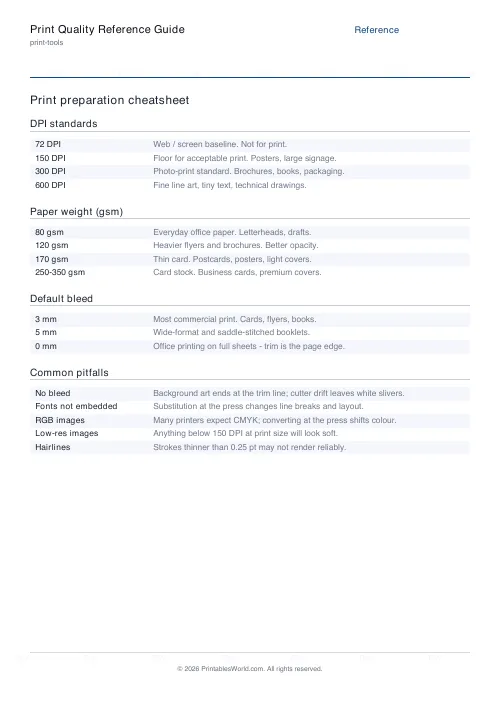
Print preparation cheatsheet
DPI bands, paper weights, bleed defaults, and common mistakes. Skim before you export.
DPI standards
| 72 DPI | Web / screen baseline. Not for print. |
| 150 DPI | Floor for acceptable print. Posters, large signage. |
| 300 DPI | Photo-print standard. Brochures, books, packaging. |
| 600 DPI | Fine line art, tiny text, technical drawings. |
Paper weight (gsm)
| 80 gsm | Everyday office paper. Letterheads, drafts. |
| 120 gsm | Heavier flyers and brochures. Better opacity. |
| 170 gsm | Thin card. Postcards, posters, light covers. |
| 250–350 gsm | Card stock. Business cards, premium covers. |
More
Bleed and pitfalls
Default bleed
| 3 mm | Most commercial print. Cards, flyers, books. |
| 5 mm | Wide-format and saddle-stitched booklets. |
| 0 mm | Office printing on full sheets — trim is the page edge. |
Common pitfalls
| No bleed | Background art ends at trim line; cutter drift leaves white slivers. |
| Fonts not embedded | Substitution at the press changes line breaks and layout. |
| RGB images | Many printers expect CMYK; conversion at the press shifts colour. |
| Low-res images | Anything below 150 DPI at print size will look soft. |
| Hairlines | Strokes thinner than 0.25 pt may not render reliably. |
PDF paper size
People also used
DPI Calculator
Calculate DPI, print size, or required pixels for sharp, print-ready images.
Bleed and Margin Calculator
Work out full-bleed dimensions, safe zones, and margins for any trim size.
Paper Sizes Calculator
Compare paper sizes and convert dimensions to pixels for accurate print design at any resolution.
Feedback
Spotted something off with this tool?
A Reference Guide to DPI, Paper Weight, Bleed and Print Pitfalls
Use this guide as a single-page reference for the numbers you need to prepare files for print correctly.
It covers the standard DPI bands and what each is for, paper weight (gsm) ranges with typical uses, default bleed values for common print products, and a short checklist of the mistakes that most often ruin a run. Read it on the page or download the same reference as a printable PDF to pin above a workstation.
The guide is aimed at graphic designers stepping into print for the first time, self-publishers who rarely leave the digital side, print-shop operators onboarding new customers, and home users who just want to know whether 150 DPI is "enough".
Why use a print quality reference?
Print failures rarely happen because the software could not do the job. They happen because a designer assumed the wrong DPI, chose the wrong paper weight, or forgot to add bleed. Use this guide for:
- confirming DPI thresholds before exporting a PDF
- picking the right paper weight for flyers, cards, or books
- looking up default bleed values for different print products
- pre-flight checks before handing a file to a printer
- explaining quality concepts to clients and colleagues
- spotting the common mistakes that fail silently in preview
Everything is in plain language, with the numbers you actually need rather than a full pre-press textbook.
What the guide covers
The reference is organised into the four tables that pre-press staff reach for most often:
- DPI standards: 72 (web), 150 (draft), 240 (good photo), 300 (commercial), 600 (line art and small text)
- Paper weight ranges in gsm, from 80 gsm office paper up to 350 gsm card stock
- Bleed defaults for business cards, flyers, brochures, booklets, and wide-format
- Colour mode guidance: CMYK for print, RGB for screen, Pantone for spot colour
- Common pre-press pitfalls with quick fixes
Each section stands alone so you can jump to the relevant table without reading the whole page.
Notes and limitations
- The guide is a starting point, not a substitute for your printer's spec sheet. Always verify exact DPI and bleed requirements before a final export.
- Paper weight does not equal thickness. 120 gsm uncoated paper feels heavier than 120 gsm gloss because of the coating.
- CMYK profiles differ between presses (Fogra, GRACoL, SWOP, ISO coated v2). For colour-critical work, ask your printer which profile to soft-proof against.
- Pantone spot-colour reproduction depends on paper and press — always proof on the stock you will print on.
Who this guide is for
The reference is written for anyone preparing, quoting, or approving print work.
Graphic designers
Keep a quick lookup at hand so DPI, paper, and bleed questions do not break creative flow.
Self-publishers
Understand the quality expectations of commercial printers without having to read a specialist pre-press manual.
Print-shop owners
Hand a consistent reference to customers so files arrive closer to spec and pre-press time drops.
Home users
Figure out why a photo looks fine on screen but pixelated on paper, and pick a paper weight that suits the project.
DPI standards explained
72 DPI
The historical web and screen baseline. Fine for an on-screen PDF but soft and blocky in print at anything above a thumbnail size.
150 DPI
The floor for acceptable print. Suitable for posters and banners viewed from a distance, internal proofs, and quick draft prints.
240 DPI
Looks high quality for photo prints held at reading distance. Many inkjet drivers use this as their default photo mode.
300 DPI
The commercial standard for photo-quality prints, brochures, and book interiors. Aim for this wherever possible.
600 DPI
Reserved for fine line art, technical drawings, and small serif text where each stroke needs sharp edges.
Paper weight in practice
80 gsm
Everyday office paper. Ideal for drafts and home printing, too thin for professional flyers.
100 to 120 gsm
Light flyers and letterheads. Feels slightly more substantial than office paper.
170 gsm
Heavy flyers, thin card, and quality brochure covers.
250 to 350 gsm
Business cards, premium postcards, and packaging. At 350 gsm the card is noticeably stiff.
How to use the guide
- Open the guide before you start a new print project.
- Check the DPI band for the product you are making.
- Pick the paper weight that matches the feel and durability you need.
- Confirm the bleed default for the product type.
- Run through the pre-press pitfalls checklist before exporting your final PDF.
- Download the PDF version and pin it above your workstation for repeat reference.
Worked example
Imagine you are preparing a 24-page A5 brochure for a small business. The guide points you to 300 DPI for interior photos, 120 to 170 gsm paper for a body that feels substantial without being card, 3 mm bleed on every side, and CMYK colour mode. The pre-press checklist reminds you to embed fonts, flatten transparency, and convert RGB images to CMYK before export.
With those five numbers locked down — 300, 170, 3, CMYK, embed — the export almost takes care of itself.
Methodology
The numbers in this guide are drawn from prevailing commercial print standards in the UK and North America, including ISO 12647 for offset print, typical Fogra and GRACoL colour targets, and the bleed defaults used by major online print services. They are deliberately conservative so that files hitting these specs will pass pre-press at almost any commercial printer.
Helpful checklist
- Embed all fonts or outline them before export.
- Convert RGB images to the correct CMYK profile.
- Add 3 mm bleed (or your printer's requested amount) on every side.
- Flatten transparency for pre-press stability.
- Check image DPI at final printed size, not at document zoom.
- Soft-proof against your printer's ICC profile.
- Export a single-page proof before the full run.
Best ways to avoid pre-press surprises
- Ask your printer for their spec sheet and save it locally.
- Use a pre-flight tool in Acrobat or your layout app before sending.
- Request a hard-copy proof for anything colour critical.
- Review the PDF at 100 percent zoom to spot low-resolution placements.
- Keep a short personal checklist of the mistakes you make most often.
Most print disasters are preventable with a two-minute pre-flight check.
Related print-production tools
You may also find these related print-tools calculators useful:
FAQs
Quick answers
What DPI should I use for screen vs print?
72 DPI is the historical web/screen baseline. 150 DPI is the floor for acceptable print, 300 DPI is the photo-print standard, and 600 DPI is reserved for fine line art and small text.
What does “gsm” mean for paper?
gsm = grams per square metre. 80 gsm is everyday office paper, 120 gsm is heavier flyers, 170 gsm is thin card, 250–350 gsm is business card stock.
What bleed should I add?
3 mm bleed is the default for most commercial print. Wide-format and saddle-stitched booklets often ask for 5 mm. Always check your printer’s spec sheet.
What is the most common print mistake?
Forgetting to embed fonts and forgetting bleed. Both fail silently in preview and only show up after the cutter has run. Always export with bleed and embed all fonts.
Related tools
DPI Calculator
Calculate DPI, print size, or required pixels for sharp, print-ready images.
Bleed and Margin Calculator
Work out full-bleed dimensions, safe zones, and margins for any trim size.
Paper Sizes Calculator
Compare paper sizes and convert dimensions to pixels for accurate print design at any resolution.
