Print Tools
Image Resolution Checker
Check whether your image has enough pixels for a sharp print at any target size.
Last updated:
What this tool does
Paste in your image’s pixel width and height plus the print size you want. The checker returns the effective DPI and a quality verdict: very high (300+), high (240+), moderate (150+), or low. Use it before sending photos and artwork to print.
Settings
Image and print size
Print unit
Result
Effective resolution
Effective DPI
500 DPI
Very high quality
Suitable for any photo print.
Width DPI
500
Height DPI
500
The verdict bands are 300+ very high, 240+ high, 150+ moderate, anything else low. Posters viewed from a distance can tolerate lower DPI than handheld prints.
People also used
DPI Calculator
Calculate DPI, print size, or required pixels for sharp, print-ready images.
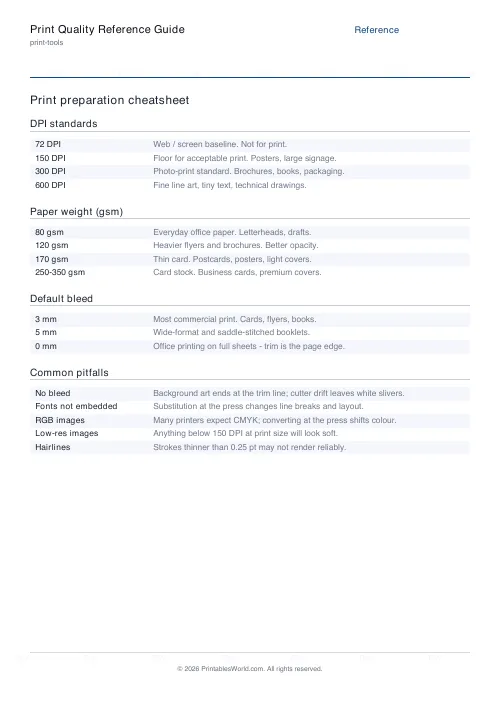
Print Quality Reference Guide
A printable reference for DPI standards, paper weights, bleed defaults, and common pitfalls.
Paper Sizes Calculator
Compare paper sizes and convert dimensions to pixels for accurate print design at any resolution.
Feedback
Spotted something off with this tool?
Check Image Resolution and Effective DPI Before You Print
Confirm whether an image has enough pixels to print sharply at a chosen size, before you commit to exporting a final PDF or sending files to a printer.
Enter the image's pixel width and height along with the target print dimensions in millimetres or inches, and the checker returns the effective DPI and a plain-language verdict: very high (300+), high (240+), moderate (150+), or low. It is the fast pre-flight check most design software quietly hides inside a dialog.
The tool is designed for graphic designers who receive photos from clients, self-publishers placing cover and interior images, print-shop owners running over-the-counter jobs, and home users who have been burned once by a pixelated enlargement.
Why use a resolution checker?
Low-resolution images look fine on screen because your monitor shows them at one-to-one pixel size. When they are stretched to fill a magazine page, printed onto a card, or blown up to poster size, every pixel turns into a visible square. Use this tool for:
- photo prints and enlargements
- book and magazine cover images
- flyer and brochure photography
- website-to-print reuse checks
- stock photo size verification
- client-supplied asset vetting
It is the fastest way to catch a "too small" image before the files go to press, rather than after.
What you can customise
The checker asks for the handful of inputs that determine print quality:
- Image pixel width and height
- Target print width and height
- Unit toggle between millimetres and inches
- Target DPI for the verdict (default 300, configurable)
- Aspect-ratio lock to preserve the original proportions
It returns effective DPI as a single number, a verdict band, and the largest size the image can be printed at a given target DPI.
Notes and limitations
- The checker looks at pixel count only. It does not assess compression, blur, noise, or focus. A 4000 x 3000 JPEG shot badly will still look bad at 300 DPI.
- Effective DPI is taken as the smaller of the width and height ratios — the weaker dimension dictates final sharpness.
- Viewing distance matters: 300 DPI is the gold standard at arm's length, but 150 DPI looks perfectly sharp on a poster viewed from two metres.
- AI upscaling can help, but it works best on photographs, not on text or line art. When the subject has hard edges or small type, reshooting or replacing the source is usually the right answer.
- Vector artwork (SVG, PDF, EPS) is resolution-independent and should not be run through this checker.
Who this checker is for
This tool supports anyone who places raster images into print-ready artwork.
Graphic designers
Vet client-supplied photos and stock images before placing them, and give clear feedback when an asset is too small for the intended use.
Self-publishers
Check cover art, interior photos, and author portraits before packaging them into a book PDF for a print-on-demand service.
Print-shop owners
Give walk-in customers an immediate answer when they ask "will this print well at A3?" without running the file through a full RIP.
Home users
Check whether that favourite phone photo is big enough for a canvas print, a 10 x 15 inch gift, or a school project poster.
Verdict bands explained
Very high (300 DPI or more)
Suitable for any print at reading distance: photo books, brochures, magazines, fine art. No concerns.
High (240 to 299 DPI)
Still very good for most commercial print. The difference from 300 DPI is rarely visible without a loupe.
Moderate (150 to 239 DPI)
Fine for posters and signage viewed from half a metre or more. Soft but acceptable for short-run flyers and newsletters.
Low (below 150 DPI)
Visibly pixelated at reading distance. Consider reshooting, replacing, or printing at a smaller final size.
How to use the tool
- Open the image in your operating system's file info dialog and note the pixel width and height.
- Enter those pixel dimensions into the checker.
- Choose your units: millimetres or inches.
- Enter the target print width and height.
- Optionally adjust the target DPI (keep 300 for commercial, 240 for photo, 150 for posters).
- Read the effective DPI and verdict.
- If the verdict is moderate or low, use the suggested maximum size to scale the image down or replace the source.
Worked example
A 4000 x 3000 pixel photograph placed at A4 (210 x 297 mm) gives an effective DPI of roughly 343 — comfortably in the very high band. The same photograph placed at A3 (297 x 420 mm) drops to around 242 DPI, still in the high band. Placed at A2 (420 x 594 mm) it falls to about 171 DPI, into the moderate band. At A1 it slips below 150 DPI and the verdict switches to low.
The maximum size at 300 DPI for this image is roughly 338 x 254 mm — a little over A4 landscape. Above that size, quality starts to drop.
Methodology
Effective DPI is calculated by dividing image pixel width by print width in inches, and image pixel height by print height in inches, then taking the smaller of the two values. The verdict is a look-up against standard print-industry thresholds: 300 for very high, 240 for high, 150 for moderate. The maximum print size at a given target DPI is derived by dividing pixel dimensions by the target DPI.
Helpful preset ideas
- 300 DPI for photo books, brochures, and magazines
- 240 DPI for quality photo prints at moderate sizes
- 150 DPI for posters and signage viewed at half a metre or more
- 72 DPI for on-screen PDFs (not for print)
- 600 DPI for fine line art, logos, and small-size text reproduction
Best ways to avoid resolution problems
- Shoot and archive at the highest resolution your camera supports.
- Keep a vector version of logos and icons wherever possible.
- Check every placed image at its final size before exporting to PDF.
- Warn clients clearly when an asset is too small, and suggest a larger replacement.
- For posters, remember viewing distance and do not over-engineer to 300 DPI where 150 DPI looks identical.
The cheapest fix is the one applied before the file goes to press.
Related print-production tools
You may also find these related print-tools calculators useful:
FAQs
Quick answers
What DPI counts as “sharp”?
300 DPI is the gold standard for photo prints viewed at arm’s length. 240 DPI looks high quality, 150 DPI is moderate, and below 150 starts to look soft up close.
How is the verdict calculated?
Effective DPI is the smaller of (pixel width / print width in inches) and (pixel height / print height in inches). The verdict bands are 300+ very high, 240+ high, 150+ moderate, anything else low.
Can I upscale a low-resolution image?
You can resample an image larger but it will not invent detail — it will look soft. AI super-resolution helps but works best on photos, not text or line art. Reshoot or replace the source if possible.
Does viewing distance matter?
Yes — billboards print at 30 DPI and look fine from across the street. The 300 DPI rule applies to prints held in hand. For posters, 150 DPI is usually plenty.
Related tools
DPI Calculator
Calculate DPI, print size, or required pixels for sharp, print-ready images.
Print Quality Reference Guide
A printable reference for DPI standards, paper weights, bleed defaults, and common pitfalls.
Paper Sizes Calculator
Compare paper sizes and convert dimensions to pixels for accurate print design at any resolution.